
Strict Mode
In JavaScript, there is two modes you can initiate for the file: Default/Non-Strict Mode and Strict Mode. Default/Non-Strict Mode is unofficially referred to as “Sloppy Mode”, because Strict Mode intentionally opts in restrictions and have different semantics compared to the Non-Strict Mode.
Strict mode makes several changes to normal JavaScript semantics:
- Eliminates some JavaScript silent errors by changing them to throw errors.
- Fixes mistakes that make it difficult for JavaScript engines to perform optimizations: strict mode code can sometimes be made to run faster than identical code that’s not strict mode.
- Prohibits some syntax likely to be defined in future versions of ECMAScript.
To invoke strict mode, just add the following line of text to the very top of the JavaScript file before anything else:
'use strict';
For a more in-depth explaination and examples of Strict Mode, use the MDN Web Documents.
Functions
Functions are one of the fundamental building blocks in JavaScript. A function in JavaScript is similar to a procedure—a set of statements that performs a task or calculates a value, but for a procedure to qualify as a function, it should take some input and return an output where there is some obvious relationship between the input and the output.
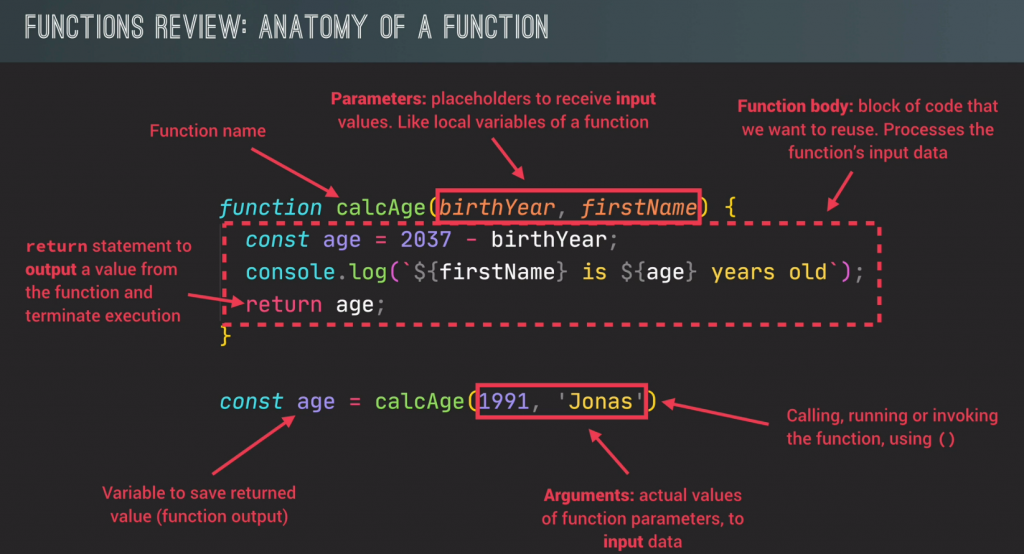
A function definition (also called a function declaration, or function statement) consists of the function keyword, followed by:
- The name of the function.
- A list of parameters to the function, enclosed in parentheses and separated by commas.
- The JavaScript statements that define the function, enclosed in curly brackets,
{...}.
(The above details on functions is taken from The MDN Web Documents)
Here’s an example of a basic function:
// Basic function
function say_hello() {
  console.log('Hello World!');
}
Whenever you execute the above “say_hello()” function, “Hello World!” will be printed to the console.
// A slightly more advanced, but still basic function
function add(a, b) {
  console.log(a + b);
}
The above function now has parameters, which requires them to be filled out for the function to execute, or else an error will be thrown.
// A function that has been assigned to a variable
const myFunc = function(a) {
  console.log("Hello", a);
}
You can even assign functions to var, let, and const variables. This is handy for when you want to store individual outputs a function may produce.
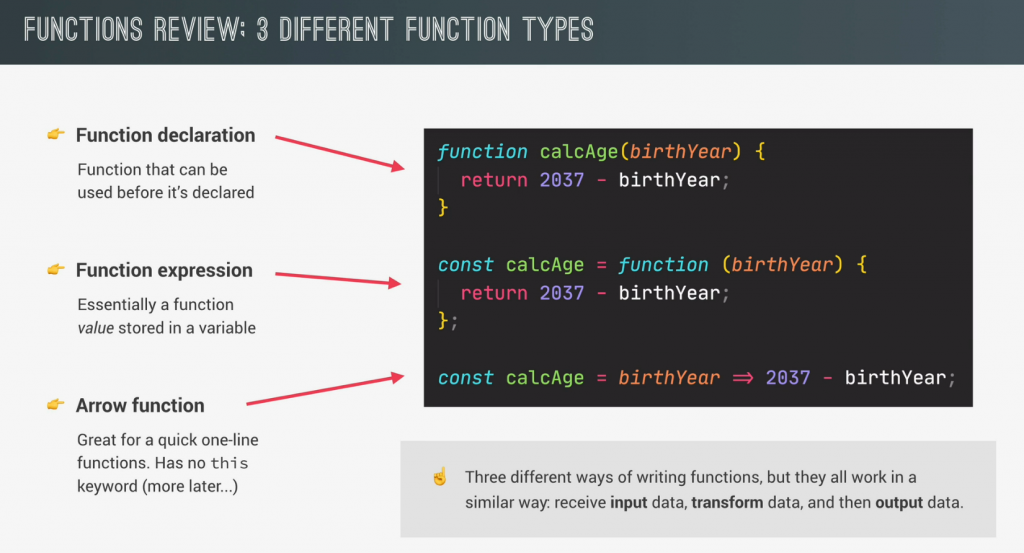
Function Declaration & Function Expression
You can declare functions in one of two ways in JavaScript; these are known as Function Declaration & Function Expression.
// Function Declaration
function add(num1, num2) {
  console.log(num1 + num2);
}
The above is a Function Declaration, it is easily told by the “function add”, aka the “function” keyword comes before the function name (“add”).
// Function Expression
const add = function (num1, num2) {
  console.log(num1 + num2);
}
This function is a Function Expression. This time the function is saved inside a const variable, and the function name (“add”) comes before the “function” keyword. (Even is on the left side of the equal side!)
So what’s the difference between these two? Function Declaration can be used before they are actually initialized, or created for simplicity; where as Function Expression CAN NOT be used before they are initialized. It is better to use Function Expression in JavaScript because they force you to use them after initialization, and therefore prevent bugs that will come with Function Declaration.
Arrow Functions
An arrow function expression is a compact alternative to a traditional function expression, but is limited and can’t be used in all situations.
There are differences between arrow functions and traditional functions, as well as some limitations:
- Arrow functions don’t have their own bindings to
thisorsuper, and should not be used asmethods. - Arrow functions don’t have access to the
new.targetkeyword. - Arrow functions aren’t suitable for
call,applyandbindmethods, which generally rely on establishing a scope. - Arrow functions cannot be used as constructors.
- Arrow functions cannot use
yield, within its body.
////// NOTE: Each step along the way is a valid "arrow function".
// Traditional Anonymous Function
function (a){
  return a + 100;
}

// Arrow Function Break Down

// 1. Remove the word "function" and place arrow between the argument and opening body bracket
(a) => {
  return a + 100;
}

// 2. Remove the body braces and word "return" -- the return is implied.
(a) => a + 100;

// 3. Remove the argument parentheses
a => a + 100;
The { braces } and ( parentheses ) and “return” are required in some cases.
For example, if you have multiple arguments or no arguments, you’ll need to re-introduce parentheses around the arguments:
// Traditional Anonymous Function
function (a, b){
  return a + b + 100;
}

// Arrow Function
(a, b) => a + b + 100;

// Traditional Anonymous Function (no arguments)
let a = 4;
let b = 2;
function (){
  return a + b + 100;
}

// Arrow Function (no arguments)
let a = 4;
let b = 2;
() => a + b + 100;
Likewise, if the body requires additional lines of processing, you’ll need to re-introduce braces PLUS the “return” (arrow functions do not magically guess what or when you want to “return”):
// Traditional Anonymous Function
function (a, b){
  let chuck = 42;
  return a + b + chuck;
}

// Arrow Function
(a, b) => {
  let chuck = 42;
  return a + b + chuck;
}
And finally, for named functions we treat arrow expressions like variables:
// Traditional Function
function bob (a){
  return a + 100;
}

// Arrow Function
let bob = a => a + 100;
(The above details on arrow functions is taken from The MDN Web Documents)
Functions Calling Other Functions
It is possible to call a function within a function.
// Function calling another function
const funcB = function() {
  console.log("I'm being called from a different function! :D");
}

const funcA = function() {
  console.log("I'm the main function that gets called!");
  funcB();
}
funcA();

// Result of the code execution above:
"I'm the main function that gets called!"
"I'm being called from a different function! :D"
As you can see, funcB() was executed inside funcA() after it finished logging “I’m the main function that gets called!”, and therefore it logged “I’m being called from a different function! :D” directly afterwards.
FUNCTIONS REVIEW
Arrays
The Array object, as with arrays in other programming languages, enables storing a collection of multiple items under a single variable name, and has members for performing common array operations.
In JavaScript, arrays aren’t primitives but are instead Array objects with the following core characteristics:
- JavaScript arrays are resizable and can contain a mix of different data types. (When those characteristics are undesirable, use typed arrays instead.)
- JavaScript arrays are not associative arrays and so, array elements cannot be accessed using strings as indexes, but must be accessed using integers as indexes.
- JavaScript arrays are zero-indexed: the first element of an array is at index
0, the second is at index1, and so on — and the last element is at the value of the array’slengthproperty minus1. - JavaScript array-copy operations create shallow copies. (All standard built-in copy operations with any JavaScript objects create shallow copies, rather than deep copies).
(The above details on arrays is taken from The MDN Web Documents)
//// Array examples
// You can put practically anything into them!
const basicArray = [1, 2, 'String', true, false, ['a nested array']];

// And then take them back out!
let arrExample = basicArray[2]; // Will extract out "String" from basicArray
console.log(arrExample); // Will log "String" to the console

// REMINDER: Arrays are zero-indexed! They start counting from 0 and not 1!
And now for some Array functions to learn!
//// Array constructor - creates a new Array object
Array()

//// Creates a new Array instance from an array-like object or iterable object
Array.from()

//// Returns true if the argument is an Array. Otherwise, it returns false
Array.isArray()

//// Creates a new Array instance with a variable number of arguments, regardless of number or type of the arguments
Array.of()

//// Reflects the number of elements in an array
Array.length

//// Returns a new array iterator object that contains the key/value pairs for each index in an array
Array.prototype.entries()

//// Returns true if every element in the calling array satisfies the testing function
Array.prototype.every()

//// Returns a new array containing all elements of the calling array for which the provided filtering function returns true
Array.prototype.filter()

//// Returns the found element in the calling array, if some element in the array satisfies the testing function, or undefined if not found
Array.prototype.find()

//// Returns a new array with all sub-array elements concatenated into it recursively up to the specified depth
Array.prototype.flat()

//// Returns a new array formed by applying a given callback function to each element of the calling array, and then flattening the result by one level.
Array.prototype.flatMap()

//// Calls a function for each element in the calling array
Array.prototype.forEach()

//// Determines whether the calling array contains a value, returning true or false as appropriate.
Array.prototype.includes()

//// Joins all elements of an array into a string
Array.prototype.join()

//// Returns the first (least) index at which a given element can be found in the calling array
Array.prototype.indexOf()

//// Returns a new array iterator that contains the keys for each index in the calling array
Array.prototype.keys()

//// Returns a new array iterator object that contains the values for each index in the array.
Array.prototype.values()

//// Returns the last (greatest) index at which a given element can be found in the calling array, or -1 if none is found
Array.prototype.lastIndexOf()

//// Returns a new array containing the results of invoking a function on every element in the calling array
Array.prototype.map()

//// Executes a user-supplied "reducer" callback function on each element of the array (from left to right), to reduce it to a single value
Array.prototype.reduce()

//// Reverses the order of the elements of an array in place. (First becomes the last, last becomes first)
Array.prototype.reverse()

//// Returns true if at least one element in the calling array satisfies the provided testing function
Array.prototype.some()

//// Sorts the elements of an array in place and returns the array
Array.prototype.sort()

//// Extracts a section of the calling array and returns a new array
Array.prototype.slice()

//// Adds and/or removes elements from an array
Array.prototype.splice()

//// Removes the last element from an array and returns that element.
Array.prototype.pop()

//// Removes the first element from an array and returns that element
Array.prototype.shift()

//// Adds one or more elements to the end of an array, and returns the new length of the array
Array.prototype.push()

//// Adds one or more elements to the front of an array, and returns the new length of the array
Array.prototype.unshift()
Objects
In JavaScript, an object is an unordered collection of key-value pairs. Each key-value pair is called a property. The key of a property can be a string. And the value of a property can be any value, e.g., a string, a number, an array, and even a function. JavaScript provides you with many ways to create an object. The most commonly used one is to use the object literal notation.
// An empty object gets created. Note how it uses { curly-brackets } to identify that what was created was an object
const emptyObj = {};
To create an object with properties, you use the key:value within the curly-brackets. Like so:
// An example of an object with a simple key:value set of properties
const newObj = {
  initials: 'LJ',
  favcolor: 'Blue',
  favNum: 42,
  experience: ['Python', 'HTML', 'CSS', 'JavaScript']
};
When an object has multiple properties, you separate them using a comma (,) like in the above example. Now to access the data in an object, you can do one of two ways: Bracket Notation, and Dot Notation.
// Bracket Notation VS Dot Notation (Part 1)
console.log(newObj[initials]);
console.log(newObj.initials);
Both of the notations in the above example will yield the same result in logging “LJ” to the console. So what’s the difference between them? Besides visually, of course. This is one of the reasons:
// Bracket Notation VS Dot Notation (Part 2)
const bvdExamp = {
  'building no': 2319
};

console.log(newObj['building no']); // Will work
console.log(newObj.'building no'); // Will NOT work
To access the key “building no”, you have to use the Bracket Notation, because otherwise you’ll get the following error:
SyntaxError: Unexpected string
Since “building no” is two words with a space, you’re forced to make it a string, which is something the Dot Notation really doesn’t like. Not only that, but its bad practice to put spacing in multi-word property key names (or variables in general).
// Bracket Notation VS Dot Notation (Part 3)
const bvdExamp2 = {
  buildingNo: 2319
};
Now if the key name was buildingNo (a conjoined camelCase word), then using the Dot Notation will work with accessing the value of the property.
So which do you use when it comes to accessing property values of JavaScript Objects? It all comes down to personal preference, there’s zero difference between the two besides how you type them and SyntaxError that will be thrown if you tried passing a string for the Dot Notation. It is generally accepted that Dot Notation is used more frequently, due to it being quicker to type and is easier to read compared to Bracket Notation.
Object Methods & the ‘this’ keyword
Continuing on from JS objects, it is possible for an object to have a property that is a function. This is referred to as an Object Method.
Object methods function nearly identical to regular functions, except for a couple details, most notably the access to the this keyword. In short, the this keyword refers to an object, which is often the one that called/invoked it. The this keyword refers to different objects depending on how it is used:
In an object method, this refers to the object. |
Alone, this refers to the global object. |
In a function, this refers to the global object. |
In a function, in strict mode, this is undefined. |
In an event, this refers to the element that received the event. |
Methods like call(), apply(), and bind() can refer this to any object. |
Getting back onto the topic of object methods, to make one, you just use the following:
// A basic JS object with an object method
const methodExamp = {
  birthYear: 2003,
  calcAge: function () {
    return 2037 - this.age;
 }
};

// The same function as the object method, only outside an object
calcAge: function () {
  return 2037 - 2003;
};
This is a basic example, but it shows how similar an object method works to a regular function, as well as showing the most basic usage of the this keyword. To call/invoke an object method, you just simply do the dot notation.
// Will log "34" (as a number) to the console
console.log(methodExamp.calcAge());
See? Its simple.
In 2015, one of the many changes that came in the second major revision to JavaScript was Enhanced Object Literals. What Enhanced Object Literals did was provide many handy shortcuts to certain operations, including one for object method declaration. Before this revision, you had to declare object methods like shown above with the examples, but now, you can simply do this instead:
const methodExamp = {
  birthYear: 2003,
  calcAge () {
    return 2037 - this.age;
 }
};
This example is the exact same function as before (and works the same too), only now it cuts out the colon (:) and “function”, allowing for easier readability.
At the end of it all, it’s all down to personal preference with how one wants to add object methods in JavaScript, via the original way by doing it like a key:value pair, or by using Enhanced Object Literals.
Learning Loops: The For-Loop
Loops are one of the most important inclusions in JavaScript, they have great versatility in their applications, and helps keep code compact should they be needed. loops do what their name suggests: They loop over and over under a condition, executing code inside its block while the condition remains true.
The most basic loop is the For-Loop, a loop that takes three arguments: The variable declaration, the condition, and the counter/iteration count.
// A basic for-loop, which will print out "Iteration #X", from numbers 1 to 9 to the console
for (let i = 1; i < 10; i++) {
  console.log(`Iteration #${i}`);
};
The first part of a for-loop is the let i = 1 on the left. Here is one of the few cases where we want to use let rather than const, because this value will be changing in the loop. This temporary variable i can be accessed in the loop (as evidenced by the console.log line of code), but it cannot be accessed outside the loop before or after the for-loop has ran (which is why its called a temporary variable).
The next part of the for loop is the condition i < 10. This condition gets checked to see if its true or not in the loop. If it is true, then the loop executes; if not, then the loop ends.
The final part of the for-loop is the i++, which means that the temporary variable i that was created for the loop should be incremented by 1 after every loop performed. i++ is actually a postfix operand, which adds 1 to the counter after loop execution. The prefix of the x++ operand is, of course, the ++x operand, which does the same thing as x++, only it adds 1 to the counter before the loop is executed.
Continuing on from the x++ explaination, there is also x-- and --x operands for JS loops, which does exactly the same as their x++ / ++x counterparts, only it predictably subtracts from the counter after and before loop execution respectively, rather than adding. This is used for when you want to loop in reverse order.
Moving back up to the code example above, to make it easier to understand why the loop stops printing at 9 and not 10, here’s the general order of how the for-loop works with its declaration.
[ let i = 1 ]
1. The temporary variable 'i' is made and assigned to the number 1.

[ i < 10 ]
2. The condition that i is less than 10 is made.

[ code block loops ]
3. The code block is executed because the condition defined is true with 'i' being less than 10.

[ i++ ]
4. The variable 'i' is incremented by 1.

[ check if true ]
5. If the condition is still true, then repeat steps 3 to 5. Otherwise, exit the loop.
As you can see, the iteration happens before the variable i is increased by 1, meaning that after the console logs “Iteration #9”, i becomes 10 in the background, and thus makes the condition of i < 10 no longer true, therefore the loop gets exited then and there.
The Break & Continue statements
There are two ways you can control if / when a JavaScript code block breaks or continues. They are, coincidentally enough, referred to as the break and continue statements. Both of these statements are the only JavaScript statements that can “jump out of” a code block.
// Syntax
continue labelname;

break labelname;
The continue statement (with or without a label reference) can only be used to completely skip 1 iteration of a loop.
The break statement (without a label reference) is used to completely exit a loop or a switch.
With a label reference, the break statement can be used to jump out of any code block. (Not just a loop or a switch.)
//// continue & break examples
// break - The code will only log "1" and "2" (as numbers) before exiting the loop completely because i === 3, which will trigger the code to break the loop
for (i = 1; i <= 5; i++) {
  if (i === 3) {
    break
  };
  console.log(`Iteration #${i}`)
};

// continue - The code will simply skip over that 3rd iteration, allowing the rest of the iterations to go uninterrupted
for (i = 1; i <= 5; i++) {
  if (i === 3) {
    continue
  };
  console.log(`Iteration #${i}`)
};
Backward Looping & Nested Loops
As mentioned previously, the x-- / --x operands are mainly used to loop backwards.
//// Looping backwards
// A basic example
console.log('Countdown of DOOM!');
for (let i = 10; i >= 0; i--) {
  console.log(`10 second(s) remaining!`);
};
console.log('DOOM!');

////// Yes this example is just to humor how countdowns are typically used in movies.
There’s not much else to explain about looping backwards. They just loop in reverse order compared to looping normally, and as such, they have roughly the same usage.
Nested loops means a loop inside another loop; as crazy as that sounds, its actually really helpful in certain cases.
//// Nested Loops
// Reminder that the temporary counter variable can be named basically anything
for (let exercise = 1; exercise <= 3; exercise++) {
  console.log(------ BEGIN EXERCISE #${exercise});

  for (let rep = 1; exercise <= 5; rep++) {
    console.log(`Lifting Weights: Rep #${rep}`);
  };
};
The above example will print out “BEGIN EXERCISE #X” (with X being the counter), followed by “Lifting Weights: Rep #Y” (with Y being the nested loop’s own counter), and this code will loop over 3 times, totaling printing the second for-loop’s contents 15 times!
Its not hard to envision how the looping works: The primary loop starts a new iteration -> It gets to the loop inside of it -> The secondary loop does its iterations under its condition -> Secondary Loop exits -> Primary loop continues iterating -> Repeat until the primary loop’s condition is no longer true.
Keep in mind that due to being in a loop block, any nested loop/function/whatever can use any and all saved datatypes (such as variables) that was initialized before them. This is known as the scope chain, but that won’t be covered in this short section summary.
Learning Loops: The While Loop
While loops are another way to loop over objects, and has a slightly different looping role compared to a for-loop.
// A basic while-loop
let counter = 1;
while (counter < 11) {
  console.log(`Iteration #${counter}`);
  counter++;
};
The above example is the same as the basic for-loop in a previous section, just to demonstrate a while-loop and the similarities between it and the for-loop. As one can see, the while-loop only takes one parameter, the condition, and like the for-loop, it will keep looping under that condition as long as it stays true. This is a bit of a double-edged sword since its way more likely for someone to accidentally create an infinite loop with a while-loop than it is with a for-loop.
While you could use a while-loop to do the same things as a for-loop, the true power of the while-loop is that its condition is not tethered to using a counter, and can be just about anything as long as the condition equates to either true or false. For example:
// A more applicable usage of a while-loop
let die = Math.trunc(Math.random() * 6) + 1;

while (die !== 6) {
  console.log(The die result is ${die}!)
  die = Math.trunc(Math.random() * 6) + 1;
};
console.log(`The search for rolling a ${die} has concluded!`);
You aren’t expected to understand the Math.trunc and Math.random() functions quite yet, but basically they’re being used here to randomly create a whole number from 1 to 6 (AKA a standard 6-sided die) each time the JavaScript file is ran.
The code above is using the random number generation in order to keep looping until the number 6 is rolled, and if the number isn’t a 6, then it prints the die result, and “re-roll” the number generation. Since the “re-rolling” code is at the end of the code block, if the die re-roll becomes 6, the loop will end right there since the condition is now false by the time comparison is made again.
As you can see with the demonstration code and the explanation above, the while-loop has a couple more broad applications of use with the condition being able to take anything that results in either true or false, and not just keeping tabs on a temporary counter variable to compare with.
To make it easy to understand what form of loop you should go with in certain cases, here’s a tip: For-loops are best when you know exactly how many iterations you need to use, and while-loops are best when you don’t know how many looping iterations are needed to get the result you want.