
DOM & DOM Manipulation
The DOM in JavaScript stands for Document Object Model, or a structured representation of HTML documents. The DOM also lets JavaScript access HTML elements and CSS styles, and allows it to modify those HTML elements and CSS styles.
The DOM gets created as soon as the HTML page gets loaded, and it represents a document with a logical tree. Each branch of the tree ends in a node, and each node contains objects. DOM methods allow programmatic access to the tree. With them, you can change the document’s structure, style, or content.
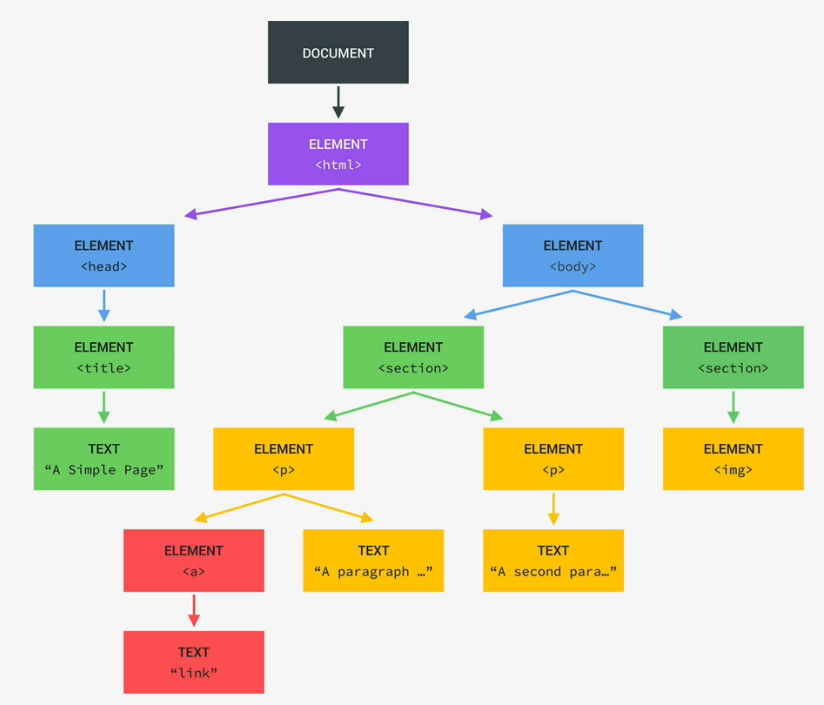
The “document” seen at the very top is important, as its the entry-point into the DOM structure with JavaScript. The first child element of the DOM is the HTML itself, then it keeps going down the child list with each element, tag, text, etc. There is even DOM elements for stuff like comments, because of a rule stating “if its in the HTML file, its in the DOM tree too”.
A common misconception on DOM, and all the methods and properties that comes with it, is part of JavaScript itself. This is not the case, as JavaScript is just a dialect of the ECMAScript specifications, and the DOM is not in it. In reality, DOM comes from Web APIs, or Application Programming Interfaces in its entirety; the DOM is simply one API that’s just naturally imported into the web by the browsers. You can think of APIs as the library for the web, and there’s loads of countless APIs to use in JavaScript.
Basic DOM Manipulation
To start off with accessing the DOM in order to manipulate it and its methods, you use document following by whatever DOM-manipulating method you wish to use; you always have to use the querySelector method (or some variation of it) to start off with selecting elements. To name a few:
document.querySelector();

document.querySelector().textContent;

document.querySelector().value;
Let’s go over these one by one, starting with querySelector();
The querySelector() method returns the first element within the DOM that matches the specific selector(s) provided to it; if there’s no matches, null will be returned instead. To select an element(s) with this method, you put a valid CSS selector string, like so:
//// HTML CODE:
<p class='p-el'>I'm a p element!</p>

//// JAVASCRIPT CODE:
const pElem = document.querySelector('.p-el');

// Will log the entire HTML code line that has the class "p-el"
console.log(pElem);
CSS selectors are noted by the leading . (dot), aka exactly the same way to select classes in CSS code. You can also select IDs with querySelector(), as well as pre-existing CSS selectors.
// ID selecting with querySelector(), using "#" as the prefix
document.querySelector('#some-class')

// You can also select pre-existing CSS selectors, which DON'T use any prefix like "." or "#"
document.querySelector('body')
There are other variations of the method to select elements, but here we’ll go over just the classic querySelector() method, and the getElementById() method right now.
The getElementById() method, unlike the querySelector() method, can only select IDs, and the ID selector provided is case sensitive. Due to the nature of IDs in CSS, there cannot be two ID with the same name; only one element can have an ID at a time. A few benefits getElementById() has over querySelector() is that it can find the specified ID quickly (if its present) since IDs by nature are already super specific, and that the selector doesn’t need any prefixes like “.” or “#”.
//// getElementById() example
// HTML CODE:
<p id="para-id">some text</p>

// JAVASCRIPT CODE:
const savedID = document.getElementById('para-id');
console.log(savedID);
Great! Now since we’ve learned about selecting elements, now its time for some basic methods you can use in order to properly manipulate the DOM! For these examples, .textContent and .value will be used.
TextContent, as it’s name suggests, returns the written text content of whatever DOM element was selected.
// Will log "some text" to the console
console.log(savedID.textContent);
It gets better, you can even change the text content of the element selected.
// Will change the text content to "I have been changed!"
savedID.textContent = 'I have been changed!';
console.log(savedID);
Value on the opposite side of things, instead handles the content of input objects, like forms you see online.
// HTML CODE
<input type="text" id="fname" size="20" name="fname" value="Joe Smith">

// JAVASCRIPT CODE
const inputValue = document.getElementById('fname');

// Will log "Joe Smith" to the console
console.log(inputValue.value);
Like with textContent, you can change the content of the input field.
// Will change the pre-inserted value to "Alito Barlien"
inputValue.value = "Alito Barlien"
The AddEventListener() Property
In JavaScript, you can add something called an event listener to an element, which will execute a function whenever a specific event is made to the target, with a basic example being clicking on something specific.
// Syntax
addEventListener(type, listener);
addEventListener(type, listener, options);
Let’s break this down:
Type — The type input is what sort of event to listen to. That can be a click of the mouse, a key press, letting go of a key, scrolling up or down, etc. Just whatever action should trigger the listener. Think of it as the how of the event method.
Listener — The listener input is the namesake of the method: It’s the action that happens when the specific trigger assigned to the listener occurs. The parameter here must be either a callback function with a handleEvent() method, or a JavaScript function. Think of this segment as the what of the event method.
Options — They’re optional functionality one can use in their EventListener, but I won’t cover over them here. You can look at the MDN Web Docs’ page on EventListeners for the details, as well as more in-depth details on the information above.
Now time for an example!
// EventListener Example: 'click' type and anonymous function
document.querySelector('.changeMe').document.addEventListener('click', function () {
  let changeMe = document.querySelector('.changeMe');
  if (changeMe.textContent === 'flip!') {
    changeMe.textContent = 'flop!';
  } else {
    changeMe.textContent = 'flip!';
  };
});
Assume for a second that this was an actual piece of functional code in a HTML/JS file. What this code does is it assigns an event listener to the class .changeMe (which we’ll assume here is a p element with text) with the event to listen for being a mouse click on the p element itself. When the p element is clicked, the event listener will trigger its function, that being changing the text content of the p element between “flip!” and “flop!” each time the element is clicked.
// Slight variation of the above example
const flipFlop = function () {
  let changeMe = document.querySelector('.changeMe').textContent;
  if (changeMe === 'flip!') {
    changeMe.textContent = 'flop!';
  } else {
    changeMe.textContent = 'flip!';
  };
};

document.querySelector('.changeMe').document.addEventListener('click', flipFlop);
This example will also work because the second input requires a function, doesn’t matter if the function is built-into the event listener or is a separate function.
Note how in this second example, the ( parentheses ) are excluded in the function input with flipFlop. This is because the function will automatically be called when the event to listen for is triggered, the only thing that’s needed is that the name between the actual function and the function that should be called in the event listener are the same (and do not conflict with existing JS keywords.)
Selecting CSS Styles
Like with selecting HTML properties using document.querySelector(), you can also use that same document method to select CSS styling, though its a bit different. After putting document.querySelector(), you then follow that up with .style, like so:
document.querySelector('.styleMe').style;
Then after that, you follow the .style with whatever CSS property you wish to manipulate with a . (a dot) on the front, much like you would with .style. Say for example you wish to change the background color style of some CSS property, you would do it like so:
document.querySelector('.styleExamp').style.backgroundColor = '#fff';
In the case of CSS style selecting, you would write the CSS property you will like to select with camelCasing if the property has two or more words, otherwise use all lowercase. Another thing to know is that for selecting CSS properties, you should always specify a string with the assignment. Here’s an example:
// NO
document.querySelector('.styleExamp').style.width = 30rem;

// YES
document.querySelector('.styleExamp').style.width = '30rem';
The QuerySelectorAll() Method
Before, we’ve been using querySelector() to select document elements to manipulate them, but as one may learn soon after starting to use them, querySelector() has quite a few limitations, namely the detail that they can only return the FIRST element that matches the query input you want them to select.
To remedy this, there’s an alternative to the querySelector() method called querySelectorAll(). QuerySelectorAll() does what the normal query selector does, only it selects all elements that matches the parameters given to it (hence the name it has), and puts them into a NodeList. The NodeList that is made via QuerySelectorAll(), for easier comparison, can be referred to as an Array.
For this example, we’ll actually have to show some HTML code:
//// HTML example code
// NOTE: Assume this was functional in an actual HTML file
<button class='queryMe'>Query Me 1</button>
<button class='queryMe'>Query Me 2</button>
<button class='queryMe'>Query Me 3</button>
Then the JS example code:
// JavaScript example code
const queryAll = document.querySelectorAll('.queryMe');

// Will log a NodeList containing the three HTML elements selected
console.log(queryAll);
So what can be done now with this node list of selected elements? Well like with Arrays, this node list can be looped over using a loop, which means you can bind each node to an event listener function.
//// The power of using the querySelectorAll() method with for-loops and event listeners
for (let i = 0; i < queryAll.length; i++) {
  queryAll[i].addEventListener('click', function () {
    console.log(`You clicked on the "Query Me ${i + 1}" button!`)
  });
};
With the above code example, each of the three example HTML buttons above will log “You clicked on the “Query Me X” button!”, with the X being their respective button separation number for clarity.
As a side note, with how the addEventListener() method works, you can save certain bits of data onto each of the iterated node items to give each one a bit of uniqueness to them (like in the example above.)
The classList Method & Subsequent Methods
One of the most important methods after selecting an element or elements via querySelector() or querySelectorAll(), is the classList method.
HTML example code:
// Assume this is functional code in an HTML file
<p class="select-me red-text black-bg">I am red text on a black background!</p>
JS example code:
const selectMe = document.querySelector('.select-me').classList;
The classList() method does one thing, and that’s return a read-only DOMTokenList collection of all the classes a given HTML element have; the above example code will return an array containing “select-me”, “red-text”, and “black-bg” because of it. Now what can you do with that returned collection? Despite being a read-only collection, you can modify the DOMTokenList associated with it with the remove(), add(), replace(), and the toggle() methods.
Here’s a quick breakdown for each of the four methods:
Remove() — Takes in N amount of string token inputs via comma separation. If any of the tokens are in the collection of classes from classList(), then remove() will remove them from the list. If any of the token(s) are not in the list, then no error is thrown, and nothing happens.
Add() — Takes in N amount of string token inputs via comma separation. If any of the tokens are not in the collection of classes from classList(), then add() will add them to the list. If any of the token(s) are in the list, then no error is thrown, and nothing happens. An error will be thrown if one of the tokens is the empty string (SyntaxError) or contains the ASCII whitespace (InvalidCharacterError).
Replace() — Takes two string inputs, one for the old token you wish to replace, and one for the new token to replace the old token with. Will return a boolean value, which is true if the old token was successfully replaced, or false if not.
Toggle() — Takes one mandatory token string input, and one optional input. Toggle() does what both remove() and add() does: If the token is not in the token list, then toggle() will add them to it, and vise versa with removing the token from the list if it is in it. No error will be thrown if the token is or is not in the list. Will return either true or false, indicating if the token is in the list after the call or not. The optional token, if included, turns toggle() into a one-way operation. If set to false, then token will only be removed, but not added. If set to true, then token will only be added, but not removed.
Now lets use these with the example code above!
//// Example code in full
// Will remove the class 'red-text' from "selectMe"'s class list
selectMe.remove('red-text');
console.log(`selectMe has lost the class red-text: ${selectMe}`);

// Will add the "green-text" class to "selectMe"'s class list
selectMe.add('green-text')
console.log(`selectMe has gain the class green-text: ${selectMe}`);

// Will replace "black-bg" with "blue-bg"
selectMe.replace('black-bg', 'blue-bg')
console.log(`selectMe's "black-bg" has been replaced with "blue-bg": ${selectMe}`);

// Will toggle 'green-text' off/on with each execution
selectMe.toggle('green-text')
console.log(`"green-text" has been toggled off: ${selectMe}`);

selectMe.toggle('green-text')
console.log(`"green-text" has been toggled off: ${selectMe}`);
Handling KeyPress Events
You can even handle keypresses with JavaScript.
// A basic example of handling KeyPresses
document.addEventListener('keydown', function (e) {
  // Logs the key pressed
  console.log(e.key);

  // Does something when a specific key (Space) is pressed
  if (e.key == 'Space') {
    console.log('The Space Key was pressed!')
  }
});
The above example you can see something new when it comes to adding an eventlistener default function: Passing in an parameter of e when executing the function. When you activate an addEventListener function, JavaScript actually generates an object of data. This object is normally in-accessible, but by including a parameter in the function call (the name doesn’t matter), you get to access that object’s data in the function, which is why the inserted parameter e is included here.
Remember, you don’t manually call the function, you only define it. JavaScript calls the function on its own, which is why passing in a parameter allows you to get the created object’s data.